-
博文分类专栏
- Jquery基础教程
-

-
- 文章:(15)篇
- 阅读:48320
- shell命令
-

-
- 文章:(42)篇
- 阅读:159874
- Git教程
-

-
- 文章:(36)篇
- 阅读:241661
- leetCode刷题
-

-
- 文章:(76)篇
- 阅读:144192
-
redigo使用和连接池分析2018-03-19 13:26 阅读(4417) 评论(0)
一、简介
redigo是提供go语言操作redis的api,redigo在go语言中的作用,正如phpredis在PHP语言中的作用。
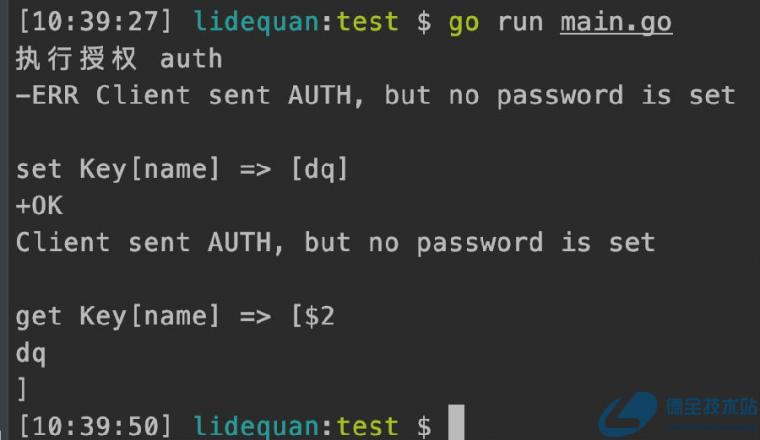
在不使用redigo的时候,我们先尝试一下,通过tcp自己封装redis的访问,如下:
package main

import (
   "fmt"
   "net"
)

func main() {
   conn, err := net.DialTimeout("tcp", "127.0.0.1:6379", 0)
   if err != nil {
      fmt.Println("conn err :", err)
      return
   }
   defer conn.Close()

   // 1、认证
   _, err = conn.Write([]byte("auth test@123"))
   if err != nil {
      fmt.Println("write err :", err)
      return
   }
   _, err = conn.Write([]byte("\r\n"))
   if err != nil {
      fmt.Println("write err :", err)
      return
   } else {
      fmt.Println("执行授权 auth")
   }

   result := make([]byte, 256)
   _, err = conn.Read(result)
   if err != nil {
      fmt.Println("write err :", err)
      return
   } else {
      fmt.Println(string(result))
   }

   // 2、设置key
   key := "name"
   _, err = conn.Write([]byte("set " + key + " dq \r\n"))
   if err != nil {
      fmt.Println("set key err :", err)
      return
   }
   fmt.Println(fmt.Sprintf("set Key[%s] => [%s]", key, "dq"))
   _, err = conn.Read(result)
   if err != nil {
      fmt.Println("write err :", err)
      return
   } else {
      fmt.Println(string(result))
   }

   // 3、获取key
   _, err = conn.Write([]byte("get " + key + "\r\n"))
   if err != nil {
      fmt.Println("get err :", err)
      return
   }
   res := make([]byte, 256)
   _, err = conn.Read(res)
   if err != nil {
      fmt.Println("read res err", err)
   }

   fmt.Println(fmt.Sprintf("get Key[%s] => [%s]", key, string(res)))
}
如果使用redigo连接操作如下:
package main

import (
   "fmt"
   "github.com/garyburd/redigo/redis"
)

func main() {
   c, err := redis.Dial("tcp", "127.0.0.1:6379")
   if err != nil {
      fmt.Println("conn err:", err)
      return
   }

   defer c.Close()
   //设置认证
   _, err = c.Do("auth", "test@123")
   if err != nil {
      fmt.Println("auth err:", err)
      return
   }

   key := "name"
   _, err = c.Do("set", key, "dequan")
   if err != nil {
      fmt.Println("set key err")
      return
   }

   name, err := redis.String(c.Do("get", key))
   if err == redis.ErrNil {
      fmt.Println("name 不存在没有数据")
      return
   }
   fmt.Println(fmt.Sprintf("set Key[%s] => [%s]", key, name))

   if err != nil {
      fmt.Println("get key err:", err)
      return
   }

   fmt.Println(fmt.Sprintf("get Key[%s] => [%s]", key, name))
}
使用连接池
redisClient := &redis.Pool{
   MaxIdle:     100, //最大连接数,即最多的tcp连接数
   MaxActive:   10, // MaxIdle 最大空闲连接数
   IdleTimeout: 5 * time.Second, // IdleTimeout 空闲连接超时时间,但应该设置比redis服务器超时时间短。否则服务端超时了,客户端保持着连接也没用。
   Wait:        true,
   Dial: func() (redis.Conn, error) {
      con, err := redis.Dial("tcp", "127.0.0.1",
         redis.DialPassword("123456"),
         redis.DialDatabase(0),
         redis.DialConnectTimeout(3*time.Second),
         redis.DialReadTimeout(5*time.Second),
         redis.DialWriteTimeout(5*time.Second))
      if err != nil {
         return nil, err
      }
      return con, nil
   },
}

conn := redisClient.Get() // 获取连接
data, _ := redis.String(conn.Do("get", "name"))
defer conn.Close()

fmt.Println(data)
二、redigo连接池源码分析
1、连接池简介
首先,我们先来想想,如果自己构建连接池,需要什么呢?
构造函数,用于创建连接
链表,用来存储空闲连接
get方法,用于获取连接
put方法,用于放回连接
close方法,用于关闭连接池
redigo连接池大致架构如下:

redigo连接池如下:
type Pool struct { // 建立连接的函数,优先使用DialContext,二则至少有一项必填 Dial func() (Conn, error) DialContext func(ctx context.Context) (Conn, error) // 当从 pool 中获取连接时, 检查这个连接是否正常使用,非必填 TestOnBorrow func(c Conn, t time.Time) error // 最多有多少个空闲连接保留, 一般必填 MaxIdle int // 最多有多少活跃的连接数, 一般必填 MaxActive int // 空闲连接最大空闲时间,redis中有, 一般必填 IdleTimeout time.Duration // 当Pool 的活跃的连接数达到 MaxActive, // 如果 Wait 为 true, 那么 Get() 将要等待一个连接放到 Pool中, 才会返回 // 如果wait为false,那么Get() 直接 Wait bool // 设置连接最大存活时间 MaxConnLifetime time.Duration // 用于控制 ch是否被初始化了 chInitialized uint32 // set to 1 when field ch is initialized mu sync.Mutex // 锁 closed bool // 控制连接池是否关闭 active int // 当前 Pool 的活跃连接数 ch chan struct{} // 用来控制Wait为 true时,get()等待时间 idle idleList // 空闲队列,是一个双向链表 waitCount int64 // 连接池中获取连接发送等待的次数,Wait为true的时候有效,便于我们调整连接数 waitDuration time.Duration // 连接池中获取连接发送等待的时间总和,Wait为true的时候有效 }2、连接获取
创建完连接池后,我们会调用如下方法,获取连接
conn := redisClient.Get() // 获取连接
Get()方法实际上调用的是GetContext方法来实现的,GetContext实现如下:
func (p *Pool) GetContext(ctx context.Context) (Conn, error) { // 当Wait为ture,且当前连接已达到最大限制的时,程序会等待,直到有可用连接 // 当然,我们也可以通过ctx 来限制等待的时间 waited, err := p.waitVacantConn(ctx) // 返回等待的时间 if err != nil { return errorConn{err}, err } p.mu.Lock() // 基于 waitCount 和 waitDuration 我们可以合理调整我们的活跃连接数和空闲连接数等 if waited > 0 { p.waitCount++ // 等待次数 +1 p.waitDuration += waited // 记录总的等待时间 } // 如果设置了空闲连接最大空闲时间 // 则将超时的空闲连接关闭掉 if p.IdleTimeout > 0 { n := p.idle.count for i := 0; i < n && p.idle.back != nil && p.idle.back.t.Add(p.IdleTimeout).Before(nowFunc()); i++ { pc := p.idle.back p.idle.popBack() p.mu.Unlock() pc.c.Close() p.mu.Lock() p.active-- } } // 如果链表中有空闲连接,则取出第一个 // 若可用,直接返回 // 若不可用,则关闭 for p.idle.front != nil { pc := p.idle.front // 取出空闲链表头元素 p.idle.popFront() // 弹出链表头元素 不明白为啥不直接在popFront()返回头元素,这样就不用写两行代码了 p.mu.Unlock() // 若设置了TestOnBorrow,基于TestOnBorrow矫正连接可用性 // 若MaxConnLifetime了,矫正当前连接的时间,是否过期 if (p.TestOnBorrow == nil || p.TestOnBorrow(pc.c, pc.t) == nil) && (p.MaxConnLifetime == 0 || nowFunc().Sub(pc.created) < p.MaxConnLifetime) { return &activeConn{p: p, pc: pc}, nil } // 连接无效 pc.c.Close() p.mu.Lock() p.active-- } // 连接池关闭了,不再新建连接 if p.closed { p.mu.Unlock() err := errors.New("redigo: get on closed pool") return errorConn{err}, err } // 判断是否超过最大活跃数 if !p.Wait && p.MaxActive > 0 && p.active >= p.MaxActive { p.mu.Unlock() return errorConn{ErrPoolExhausted}, ErrPoolExhausted } p.active++ p.mu.Unlock() c, err := p.dial(ctx) // 创建连接 if err != nil { c = nil p.mu.Lock() p.active-- if p.ch != nil && !p.closed { p.ch <- struct{}{} } p.mu.Unlock() return errorConn{err}, err } // 封装 activeConn并返回 return &activeConn{p: p, pc: &poolConn{c: c, created: nowFunc()}}, nil }3、使用连接
获取连接后,我们可以使用连接,如下:
conn.Do("get", "name")这个调用过程是怎样的呢?
调用 acticeConn的Do方法,最后会调用redis/conn.go中conn中的Do方法,如下:
func (c *conn) Do(cmd string, args ...interface{}) (interface{}, error) {
   return c.DoWithTimeout(c.readTimeout, cmd, args...)
}
conn中Do方法,实际上调用了DoWithTimeout方法。在该方法中,会将cmd和args写入,同时从连接中取出返回值。
4、关闭连接
使用完连接后,我们需要放回,即调用close方法就行,如下:
conn.Close()
实现如下:
func (ac *activeConn) Close() error {
   pc := ac.pc // 获取 poolConn
   if pc == nil {
      return nil
   }
   ac.pc = nil

   // 中间省略一部分

   ac.p.put(pc, ac.state != 0 || pc.c.Err() != nil) // 将当前  poolConn 插入到 pool空闲链表中
   return nil
}
pool的put方法实现如下:
func (p *Pool) put(pc *poolConn, forceClose bool) error {
   p.mu.Lock()
   if !p.closed && !forceClose {
      pc.t = nowFunc()
      p.idle.pushFront(pc) // 插入到空闲队列
      if p.idle.count > p.MaxIdle { // 如果超过最大空闲连接长度,会关闭最后一个空闲连接
         pc = p.idle.back
         p.idle.popBack()
      } else {
         pc = nil
      }
   }

   // 关闭连接
   if pc != nil {
      p.mu.Unlock()
      pc.c.Close()
      p.mu.Lock()
      p.active--
   }

   if p.ch != nil && !p.closed {
      p.ch <- struct{}{}
   }
   p.mu.Unlock()
   return nil
}
关于idleList的pushFront实现如下:
func (l *idleList) pushFront(pc *poolConn) {
   pc.next = l.front // 将当前pc作为头元素,next指向链表的原头元素
   pc.prev = nil
   if l.count == 0 {
      l.back = pc
   } else {
      l.front.prev = pc // 设置空闲链表,原头元素的上个节点
   }
   l.front = pc // 设置空闲链表的头元素
   l.count++ // 空闲链表长度 +1
   return
}
备注:
当前使用的redigo版本为v1.6.0,不同版本可能存在一些差异。

 摘要视图
摘要视图
 目录视图
目录视图

